
14 Dec Iteration 2022.01.R1
We are constantly making Hubert better.
Here are some of the most notable features and improvements that we have made to Hubert since the last release.
FOR USERS
Notification panel in Trampoline
To allow better technical, PR and commerce communication with Hubert’s users, we’re adding a notification panel. This new feature will guarantee you an up-to-date work environment, so you never miss an important improvement. You can see some changes in the panel, but we are still perfecting it.
Oh! And you can now click the Media-press logo to go to https://hubert.systems.
Hubert.app as a Progressive Web App
You can now enjoy our hubert.app as a PWA.
A progressive web app is a website that looks and behaves as if it is a mobile app. PWAs are built to take advantage of native mobile device features, without requiring the end user to visit an app store, make a purchase and download software locally.
In Hubert.app you can automatically and safely distribute your application in the enterprise’s environment. For a quick use- pin the icon to your start menu or taskbar.
Manual framing and choice information
You can now easily check which user manually changed the photo’s framing and when he did it in the preselection tooltip.

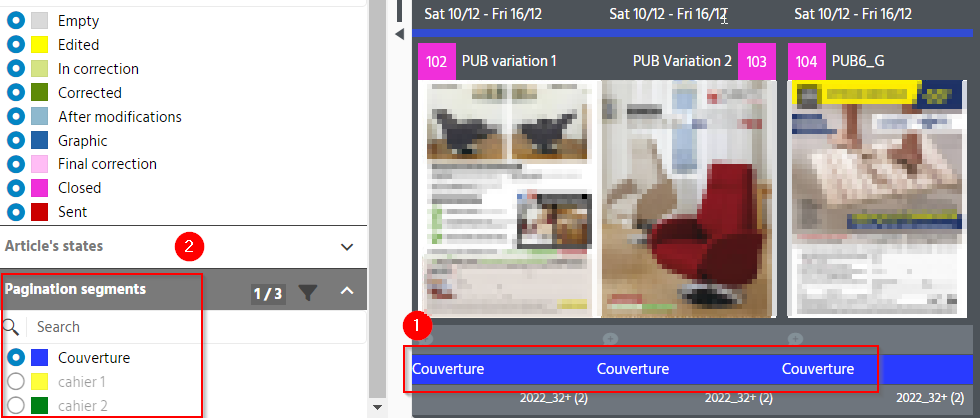
Visualization and filtering of pagination segments in Issue Manager
We’ve added a [1] visualization of your pagination segments in Issue Manager. When turned on- it shows an assigned page segment, its name and color under the project.
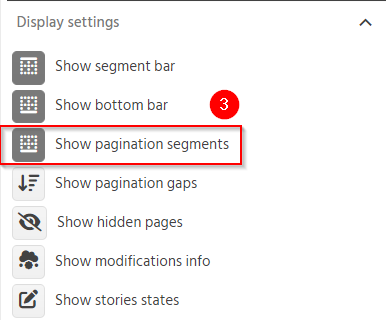
This feature also allows you to [2] filter specific pagination segments, creating an opportunity to export the segments individually. You can turn it on in the settings- [3] Show pagination segments.
Regular expressions in Tina
In Tina we’ve added an opportunity for you to open regular expressions.
Regular expression option for text in Value allows you to add an expression with named groups.
In this case the value has to be fixed.

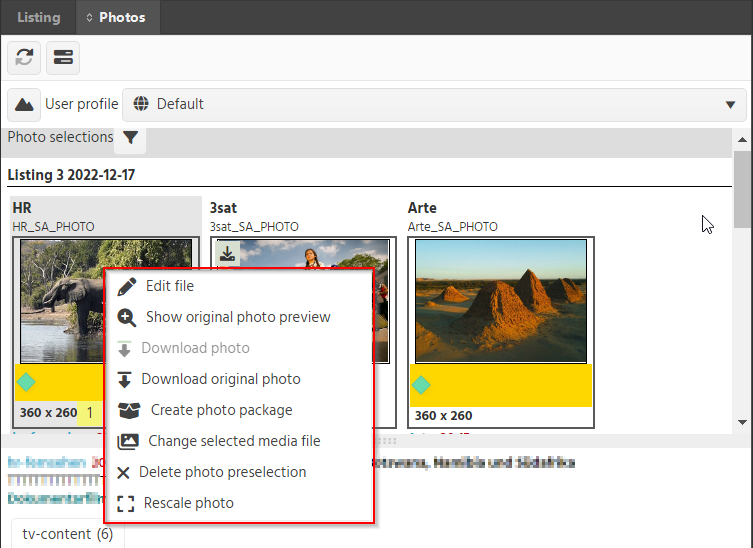
Edward’s Photos Toolbar relocation
The toolbar in Edward’s Photos has been relocated. You can find it in the context menu accessed with a right mouse click.
Here’s a quick before (left) and after (right).
FOR USERS AND ADMINS
Preselection profiles in Content Selector
We’ve added new preselection profiles in Content Selector so you can manage and personalize the profiles.
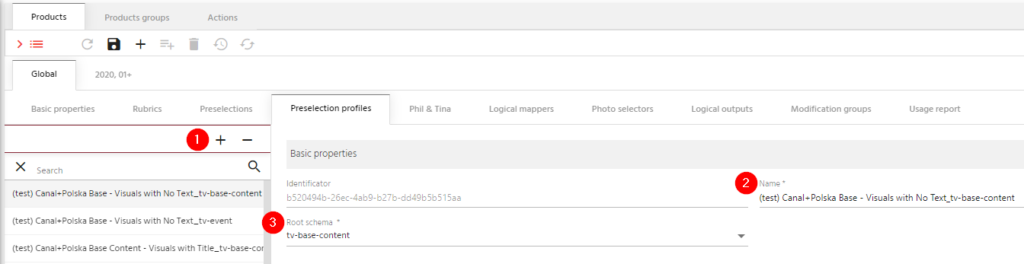
On the left side you can [1] add and delete preselection profiles. Each profile has a [2] name and a [3] root scheme for which you can add as many profiles as you’d like.
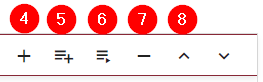
On the right side of the panel we’ve expanded a toolbar to allow you to [5] duplicate chosen selection, [6] add a cascade to the list, [7] delete one or more selections and [8] set the order of selections and cascades.
You can also [4] add a preselection to the list. Clicking the plus button opens a window where you can [1] search for a preselection assigned to the product. If you choose a preselection, its properties will appear on the right. You will find there a name of the selection [2], which you can override [3].
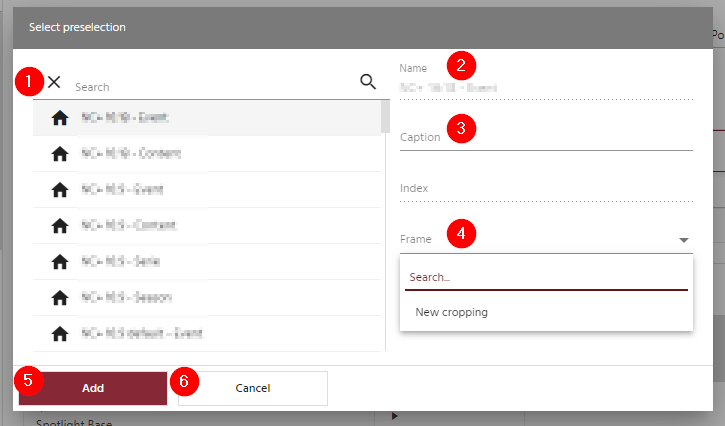
[4] For multiple-index preselection you can choose the visualized frame. For content-language preselection you can choose the visualized language. For multi-framed preselection you can choose the visualized frame. For universal preselections you can insert a linking vector which will be visualized in the selected photos column. If one of the above is not determined (null value), it will show consecutively the lowest index, a contextual language, the frame with the lowest index and any record from the selection scheme.
To add a preselection choose [5] +Add, to cancel the action choose [6] Cancel
Additional properties of OpenerX in Issue Admin
We know that sometimes you need more visualized information in the production process. Now you can enjoy additional color and property, added to your Issue Admin in Openex. They also translate directly to sites in production. Choose Show additional properties in the settings to see them under your pages during editing and printing.

Pagination segments in Issue Manager

The pagination segments have been added to Issue Manager. Now you can easily define and export exactly the segments you want.
FOR ADMINS
AREA MANAGER
Button Merging
You can duplicate definitions. We merged copy and paste buttons into clone one to spare you some time.
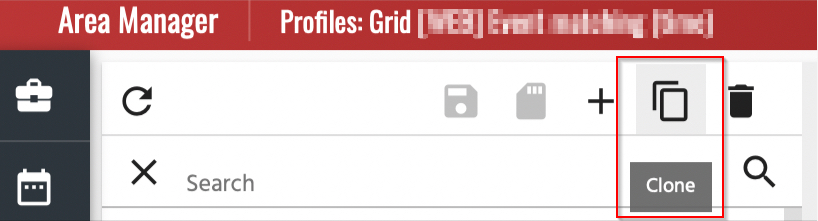
You can see this change in:
- Grid profiles,
- Search profiles,
- Format profiles,
- Link profiles,
- Filter, profiles,
- Export profiles,
- Modification profiles,
- Groups profiles,
- Mapper profiles.
Product Editor- Access to the information about a selection from cascade
A cascade contains a set of pre-selections visible in the product, arranged in a list with the given order. Now, while editing it, you can quickly see it’s definition by clicking a Show definition button.
The Product Editor has been updated with the enlargement of the preselection edition in the Product tab. The categories in the context of Cascades tab have been expanded.
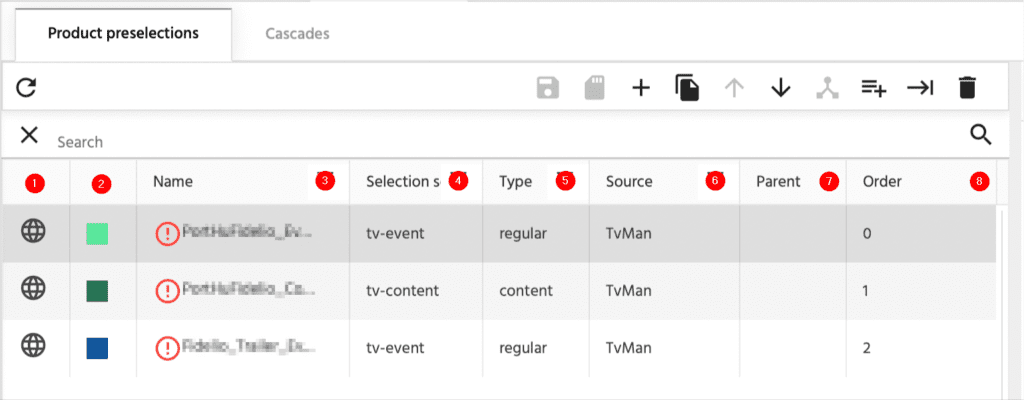
Now you can see:
[1] if your selection is global or local,
[2] the color assigned to your selection,
[3] the name,
[4] the selection schema,
[5] the type of your selection,
[6] the source,
[7] the parent
[8] and the order.
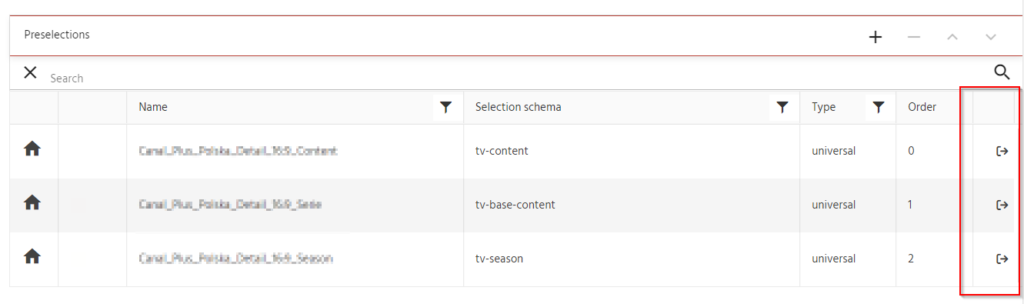
Preselections- search by TVMan’s ID
In the Preselections, aside from searching by name, you can now search by the TvMan’s preselection ID.
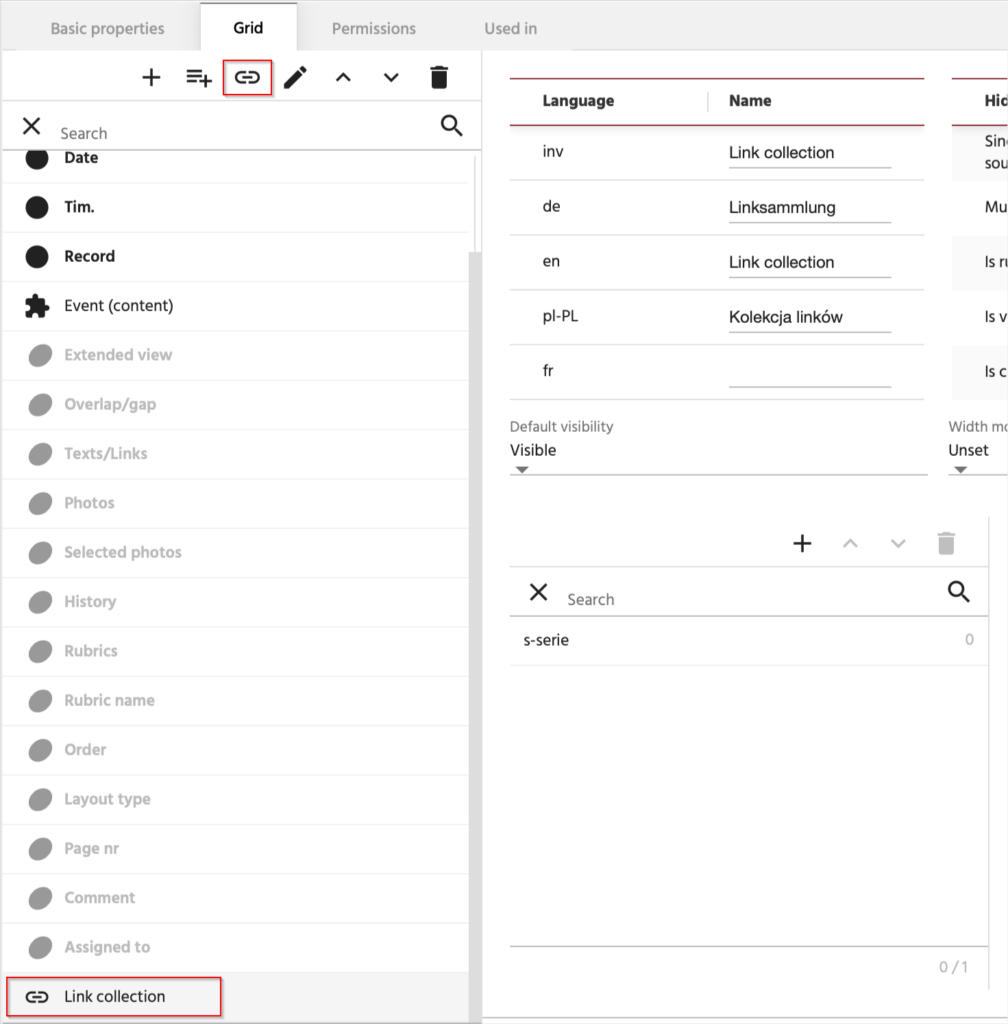
Multiple link collection columns
When using the column to move to other elements of the structure, the table stretches vertically which makes it difficult to read. Don’t worry, we figured out the solution.
Now you can add multiple link collection columns and enjoy a scroll free work.
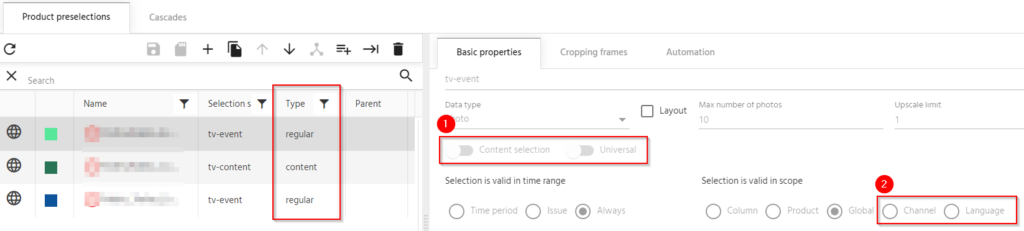
Selection type information
In the Type column we’ve expanded the information:
[1] if the content selection and universal flags are ticked, universal content is displayed.
You can’t select universal without selecting content, universal selection is
a special case of content selection.
If the content selection flag is ticked and the universal flag is unchecked- the content is displayed.
Additionally:
[2] if the valid in scope Channel mode is active- channel is added after the content name, e.g. it will be universal channel
If the valid in scope Language mode is active- language is added after the content name, e.g. it will be universal language
In other modes (column / product / global) we do not add anything after the name.
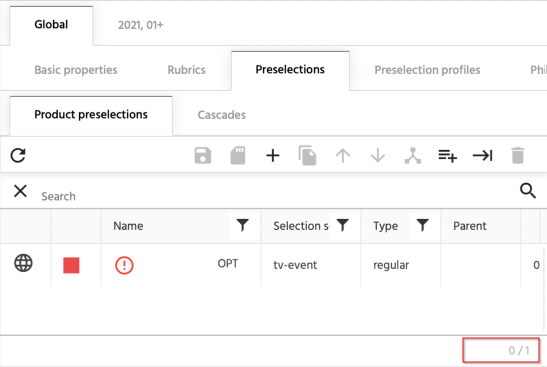
Selection Counter
In product preselections you can now see an exact number of selections on the list. It is localized at the lower right corner of the list.
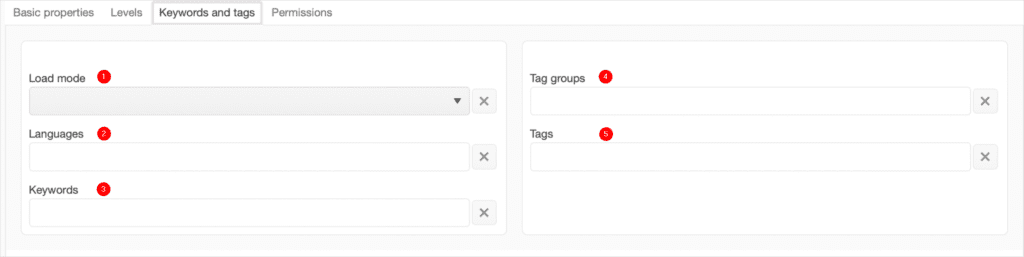
Missing properties in the photoselector definition in Product Editor
In the Product Editor’s Photo selector, we’ve added a new tab- Keywords and Tags. It defines the parameters which are used in Phoboss. On the left side the keywords:
[1] Load mode
[2] Languages
[3] Keywords
And on the right, tags:
[5] Tag groups
[6] Tags
Smart Crop parameters in preselection frame
To Area Manager’s Product Editor we’ve added a section defining Smart Crop for the preselection frame. It is placed under the main panel for editing frame parameters.
You can find find there:
[1] and [2]- minimum height and width of the resulting crop (optional), [3] the order of the information:
- User Cut – cut from Phoboss
- Objects – information about objects from Yola
- Original Photo – returns the original photo if it meets crop conditions
- Center – the photo will be centered
- Saliency Areas – information about Yola’s focus areas
- Client Areas – scaling using a mask
The default value has been set to: Original Photo, User Cut, Saliency Areas, Objects, Center


[4] the strategy
- Maximize Area – select the frame so that it covers the maximum area from the source photo (default)
- Maximize Main Object – choose a frame to maximize the main object in the photo
- Maximize Selected Face – select a frame to maximize the face with a given ID
[5] the root area from which information about objects, faces, cuts, etc. will be collected
[6] the list of additional areas
[7] Masked crop checkbox- when active- it unlocks the crop parameters panel with a mask
[8] Face rectangle- the coordinates of the rectangle that delimits the face area
[9] Saliency rectangle- the coordinates of the rectangle in which the “saliency” areas should be located
[10] Visible rectangle– the coordinates of the rectangle that is visible
[11] Disallow objects outside and [12] Decrease scoring–additional options for smart crop related to Masked crop

Additional flags controlling the course of the smart crop:
- The Without texts flag becomes active only when Flip allowed is enabled.
- Flags regarding the method of text cutting are disjoint

Crop Mode transfer
Previously, you could define a photo’s size in the preselection definition. Now, it is moved to a more convenient location- frame level. You can choose to resize the frame by pixels or use set proportions.
It allows you to have multiple crops with different sets of parameters for one selection, which should improve the data structure.
In addition, Fill by default has been added. In previous versions, when selecting a photo for selection, all ceilings were automatically filled with Smart Crop. This switch allows you to control this process.
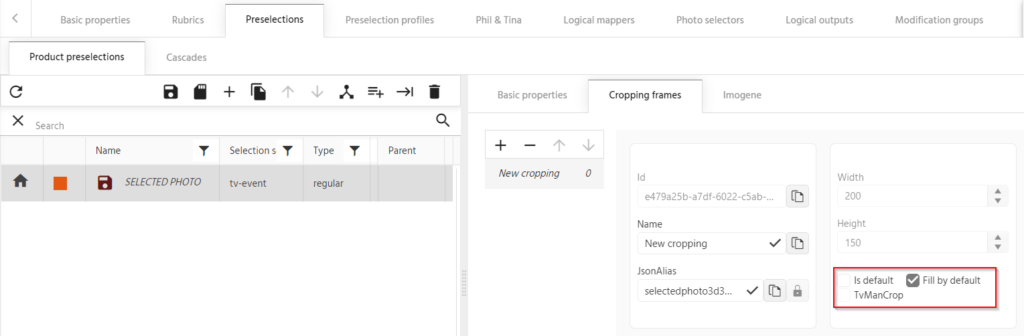
In the preselection properties, instead of the Crop Mode Combo Box, there is a Layout flag for layout selections. If this flag is checked, the Cropping frames tab remains hidden.
For selections imported from TVMan:
– Selecting a TVMan selection results in Crop to which this selection will be imported
– You can add their own ceilings to this selection
– You can change the order of crops
– The TVMan’s crop is read only and indelible (but adjustable in order).
Smart Crops parameters in preselection frame
We’ve added a new Area strategy, so you can use the order of the connection areas transferred from Hubert’s selector.

Preselection resynchronization button
In the newest version you can find a resynchronization button for new preselections.

Issue Manager
Set an optional subdirectory name on the document’s node

We’ve added a Subdirectory Name Override field to the recipes nodes. That means that you can generate a singular path for flow files. It will help to reduce the generation of unnecessary paths. It also gives you the opportunity to reopen a slimmed down file recipe and avoid unnecessary generation of empty pages.
We also changed the INDD file name field to INDD file name override.
New pagination segments definition is added to the recipes.
New pagination segments definition is added to the recipes, so you can mark the pages with given number ranges. Thanks to this update, pages can be sent in particular stages, clearly marked and filtered.
You can choose:
- a color
- the pagination segment name
- two ranges of page numbers (beginning and ending)

OpenerX- IDML files publishing from a given day
We’ve added a possibility to publish OpenerX templates from a given day. It will help you make small adjustments like a logo change- independent from OpenerX prescriptions.

Photo Selector
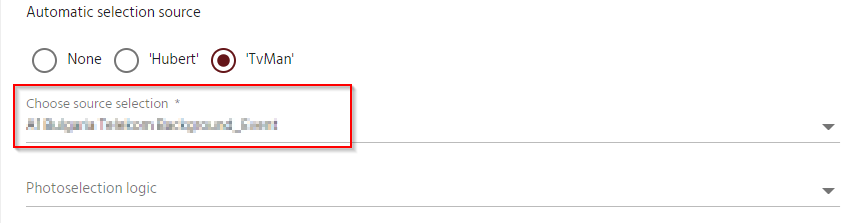
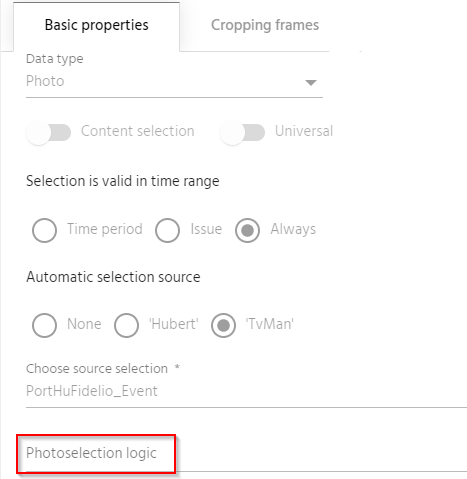
Setting the Photo Selector at the level of photo selection definition
To the Product Editor, we’ve added the Photoselection logic combo that allows us to select one of the defined Hubert photoselection logics. In the list we show the logics that have a matching root scheme.
Only global photo selectors can be inserted into global selections. Local ones within a given product are allowed to be inserted into local ones.
Selector’s definition in Product editor
This feature allows you to enable the definition of selection parameters in the photoselection and enable Hubert’s services to independently get data and levels that the photoselection does not support.
Hubert’s Photo Selectors can be defined at the global level and at the product level. We’ve now implemented it to the preselections, rubrics, projects by Tina, Phil, etc.
It has been done in the same way as the logical mapper module: in the list of Area Manager modules, a new module is showing global photo selectors and the same control lands in the global product tab. The single selector edit features:
[1] Selector name
[2] Json alias selector
[3] Root scheme which is the basis for defining selection levels


[4] Detailed description
[5] Selection Limit parameter

[6] Various parameters used by the photo selection
[7] Customary info about who and when created and changed something
The logic itself is defined in the Levels tab and it allows level duplication.
In this tab on the left side [1] we have an ordered list of levels from which photos will be aggregated and then sent to Phobos. Each level has a name and json alias. The name and json alias are unique within the photo selector.
[2] On the far right is an ordered list of areas of tension from which photos take part in the selection process. In addition to the area, you can also select the All option, which means “and all others”.
Next section [3] contains an ordered list of link vectors from which attachments for selection will be selected.
For each level you can choose phoboss logic [5] according to which the selection will be made in Phoboss. There is only one such logic per level.
Additionally you can specify [6] language features, which will further filter the selection. In addition to languages, you can select the channel option, which will be converted to the language of the channel in which the selection takes place when called.

Phoboss
Additional keyword property in columns
We have elevated the Phoboss forms by introducing their two-column layout. In the keyword properties panel in the context of the area, we’ve added a Form column property where the user could select Left (default) or Right which places the keyword in the left or right column on the form.

Additional filtering with 1:1 photos
To the list of filters for photo orientation in the Selectors tab, we’ve added a Square option for 1:1 photos. This option is also added to the current Select Best Media Record API.
If there is no completed orientation – all photos are sent.
If there is something filled – we take into account only photos with given orientations.
In this context, 1:1 photos are no longer considered Vertical or Horizontal.

Content Selector
Profile versioning
To avoid overwriting and deleting each other’s work, we’ve added a profile versioning option. You can easily change between versions, see who edited them and which one is the original.
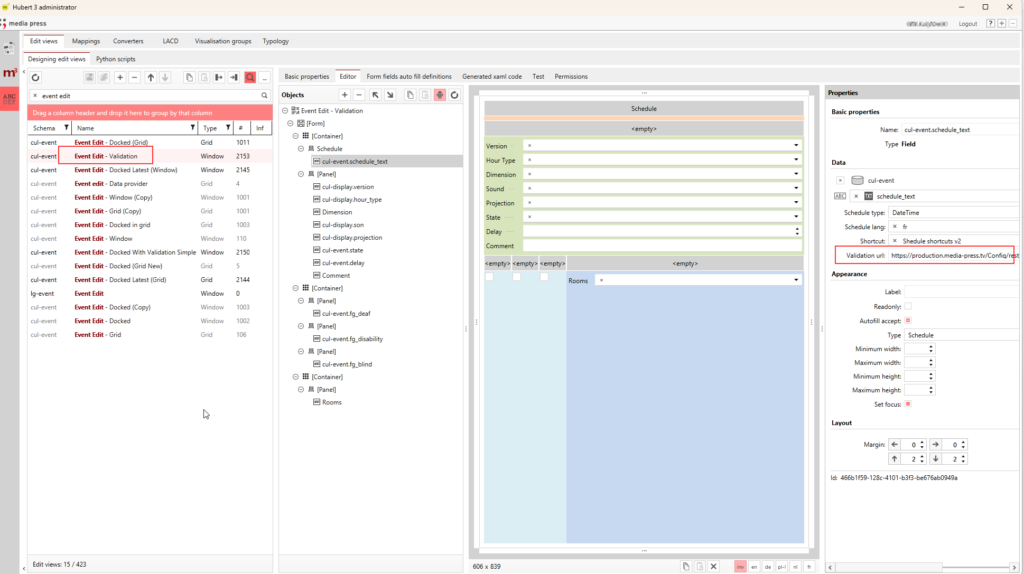
EditViews Editor- an additional control parameter in Hubert III Administrator
In the Admin’s EditViews you can enter a validation URL.
No Comments