
23 Sep Iteration 2020.01.R5
Even though the year 2020 isn’t the most profitable for anyone, we are not slowing down. We are still working on our products, on the Phoboss, Content selector, Oxana, or Area Manager, to be exact. We want to introduce you to our latest releases in the most readable and understandable form, however, in case of any doubts or questions, feel free to contact us.
See what have changed
For Users
Content selector
Schedules control and shortcuts in Web CS
New Video tab and introduction of preselection types
Introduction of the new panel for handling file attachments
Migration of Modifications tab in the web version
Indicator of modification of photo selection by the user
History tab available in Web version of Content Selector
Modification groups settings moved to Product Editor
Optimization of the profiles and workspaces display
Photo selection preview improvements
Phoboss
The possibility of changing the preview for video and document files in the UI
LanguageFeature – original
Additional filters and more useful functional Phoboss UI
Creating jobs from Content Selector
For Admins
Content Selector
New preselections – media types
Migration of Channels to the web version & introduction of new features
Channels migrated to the web app (System manager)
Preselection Universal – new type of preselection definition
New features for convenient editing of tag lists
New edition of CS Web link collection
Oxana
New parameter to API/Oxana
Generating final photos, script integration and changes in the “Access” tab
Oxana – New section: Users and Timestamps
Oxana UI optimization
Filter of exported attachments in UI Oxana
Oxana – generating photos
Area Manager\Preselections
Imogene guide mask
Import new TvMan preselection, available from Area Manager level
Admin\Mappings
Selector GetPreselection and image selection from universal selection in nested links
Additional properties in the GetField selector
Area Manager
Universal import/export of channel lists
Area Manager\Profiles – Grid
Default visualization in the grid profile
Area Manager/Product editor/ Texts archive configuration
Harvesting text with soft/hard-line feeds to live archive
Area Manager\Product Editor
Visibility of Azure / File accounts in the product
Final solution to migration between InDesign versions
Default language for the search in the search column
Actions
Action panel – new options
Phoboss\Filters
New UI management filters
System Manager
New System Manager tab

Content selector
Schedules control and shortcuts in Web CS
In order to improve the work of rectors and make it even easier and more intuitive to navigate through the Content Selector, we have introduced a number of global keyboard shortcuts that work regardless of the current positioning of the cursor.
The specifies shortcuts only work if the focus is within the described panel:
[1] Panel with columns:
- [alt + shift + C] – Global shortcut that opens the panel with columns and positions the cursor in the Search field
- In the Search field, if only one column is found, the ENTER key selects it and moves the focus to the navigator
- TAB / Shift-TAB – focus switch from Search field to the list and back
- ENTER selects a column and moves focus to navigator [2]
[2] Navigator:
- [alt + shift + R] – global shortcut that transfers the focus to the Navigator – to the table
- [alt + shift + S] – global shortcut that transfers the focus to the Navigator – to the field search
- Up and down arrows navigate through the selection – PageUp / PageDown / Home / End
- Shift + PageDown – next page from pagination
- Shift + PageUp – previous page from pagination
- Shift + Home – first page from paging; first record
- Shift + End – last page from paging, last record
[3] Edit record
- [alt + shift + E] – global focus shortcut to edit the record
- Tab/Shift + Tab – switching between fields of the form
- Ctrl + S – save the record
- Ctrl + O – save, switch to the previous record and focus in the default field
- Ctrl + P – save, switch to the next record and focus in the default field
However, to make it easier for recruiters to enter repetitive information, it is possible to add your own keyboard shortcuts from the event editing level.
In the edit control view, in addition to the edit field, a panel may appear showing user-defined keyboard shortcuts:

You can define a keyboard shortcut using the [1] button in the top right corner. It consists of the text that you want to paste into the edit field after activation of the shortcut.
Calling the keyboard shortcuts follows after pressing the combination Ctrl + keyboard shortcut.
Users can define a new shortcut by pressing the [1] button.
Then a window opens with fields for entering the [2] phrase and an optional shortcut button.
The value entered in [2] field is the subject to the following validations:
- it cannot be the same as any of the values already entered
- cannot be combined with a Ctrl shortcut that cannot be redefined in the browser
- cannot conflict with our global shortcuts
- we only letters (upper and lowercase), numbers and free function keys
Clicking OK adds the shortcut to the top of the list.
User-defined shortcuts are saved in the context of the edit form/field in the workspace.

The above panel shows the keyboard shortcuts defined by the user, showing from the left:
1 – activation key
2 – the text that is going to be paste
3 – content moving button
4 – shortcut editing button
5- removing the hotkey button
Clicking on the shortcut record has a similar effect to pressing a combination of buttons – its value is added to the edit field at the cursor position.
New Video tab and introduction of preselection types
For editors to be able to efficiently manage video files from Content Selector, we have created a new “Video” tab.

The “Video” tab is practically a copy of the “Photos” tab so that users can easily navigate through the new functionality based on their experience.

The difference between the “Photos” tab and the “Video” tab is that the former shows only photos and the other presents only videos. The description of the included files is similar:
1 – Name of the attachment
2 – Source of the attachment
3 – Copyright
The rest of the tab works in the same way as the “Photos” tab.
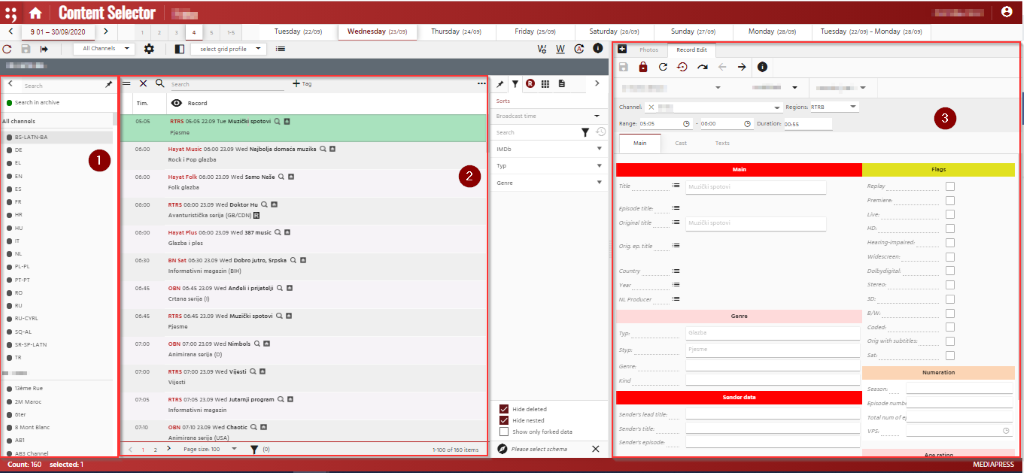
Introduction of the new panel for handling file attachments
Phoboss is expanding – it can store not only photos and videos but also files (e.g. text files, pdfs). We wanted to help our customers in conveniently and efficiently managing files from their profiles by introducing the new panel which handles file attachments.
The mentioned panel is largely similar in appearance to the photo panel, so that our customers can easily move around it:

1 – The button that allows you to move between files connected to a specific scheme or more general
2 – The button that allows you to open a selected file in the default browser
3 – The button that allows you to download the selected attachments
4 – Transition to Phoboss (information mode)
5 – Transition to Phoboss (edit mode)
6 – Hide the file button
7 – Import events (content or attachments) button
8 – Upload file button (the selected record)
9 – Phoboss search switch
10 – Filter window switch – after pressing it, hte filters window will slide out; to close it, press the button again
11 – Date of adding the attachment to Phoboss
12 – File type icon
13 – The name of the attachment
14 – Tab showing files of a given schema
15 – Select the sort mode button
In addition to the above-mentioned functionalities, the following have also been added:
- Double-clicking on the selected file opens the file in the default browser
- It is possible to sort selected columns of the table according to size, alphabetical order or date of creation
- Likewise, there is also a possibility to filter the selected columns basing on copyright, selections, type, size or date of creation)
Migration of Modifications tab in the web version
We have introduced a migration of Modifications tab in the web version of Content Selector. Adding to that we have updated it with new functions.
In the first column there are visible icons which describe what kind of modification on broadcast was done. Icons are displaying in two variants:
- red background (modification has been done by system)
- transparent background (modification has been done manually by user)
Date column has been separated into two different columns (Date and Time). Relation is also a new column which describes on which schema modification was done, showing the whole linking vector path.

In case of entry types-Attachment, After the column is displaying the ID of attachment, after moving the cursor to ID it is showing attachment preview.

Indicator of modification of photo selection by the user
Red dot indicator has been added to inform whether the photo selection was modified by the user. Hovering over the change icon shows the author of the change, as well as the photo preview in a tooltip.

History tab available in Web version of Content Selector
From now the History tab is also accessible in the web version of Content Selector. The tab includes filtering functionalities as in Silverlight version.

Modification groups settings moved to Product Editor
Modifications group settings of web CS are now available in Product Editor under Global tab in product settings.
Basic properties:
- Name
- Color
- Root Schema
Modifications groups set in web Product Editor are visible only in the web version of Content Selector. The Silverlight version of CS still uses the modification profiles settings.

Optimization of the profiles and workspaces display

The display of the list of available profiles and workplaces has been optimized. From now on, the profiles are presented in three ways, depending on the workspaces included within. The profile can have:
- No workspace
- One workspace
- Two or more workspace
Profile with no workspace is presented by its name, profile with one workspace presented by its name with the name of workspace afterwards. Profile with two or more workspaces is presented by its name and workspaces in drop down list.
Example:

Photo selection preview improvements
Hovering the cursor over the picture user will see its preview with additional information. This solution simplifies the work of editors.

The name of the selected photo/cascade and a bar with the colour of the photo-selection have been added to the preview.
Imageholders have been enlarged for more convenient work with photos.
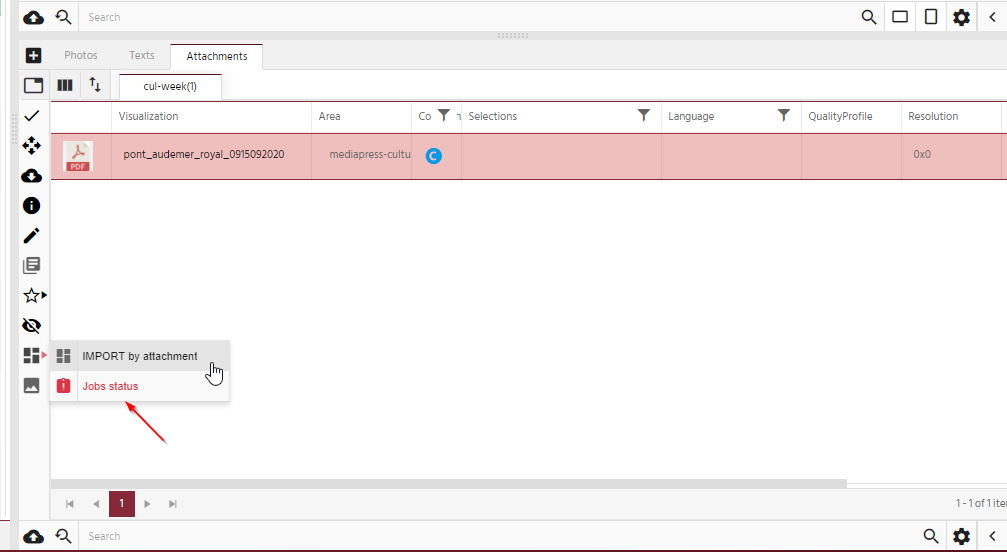
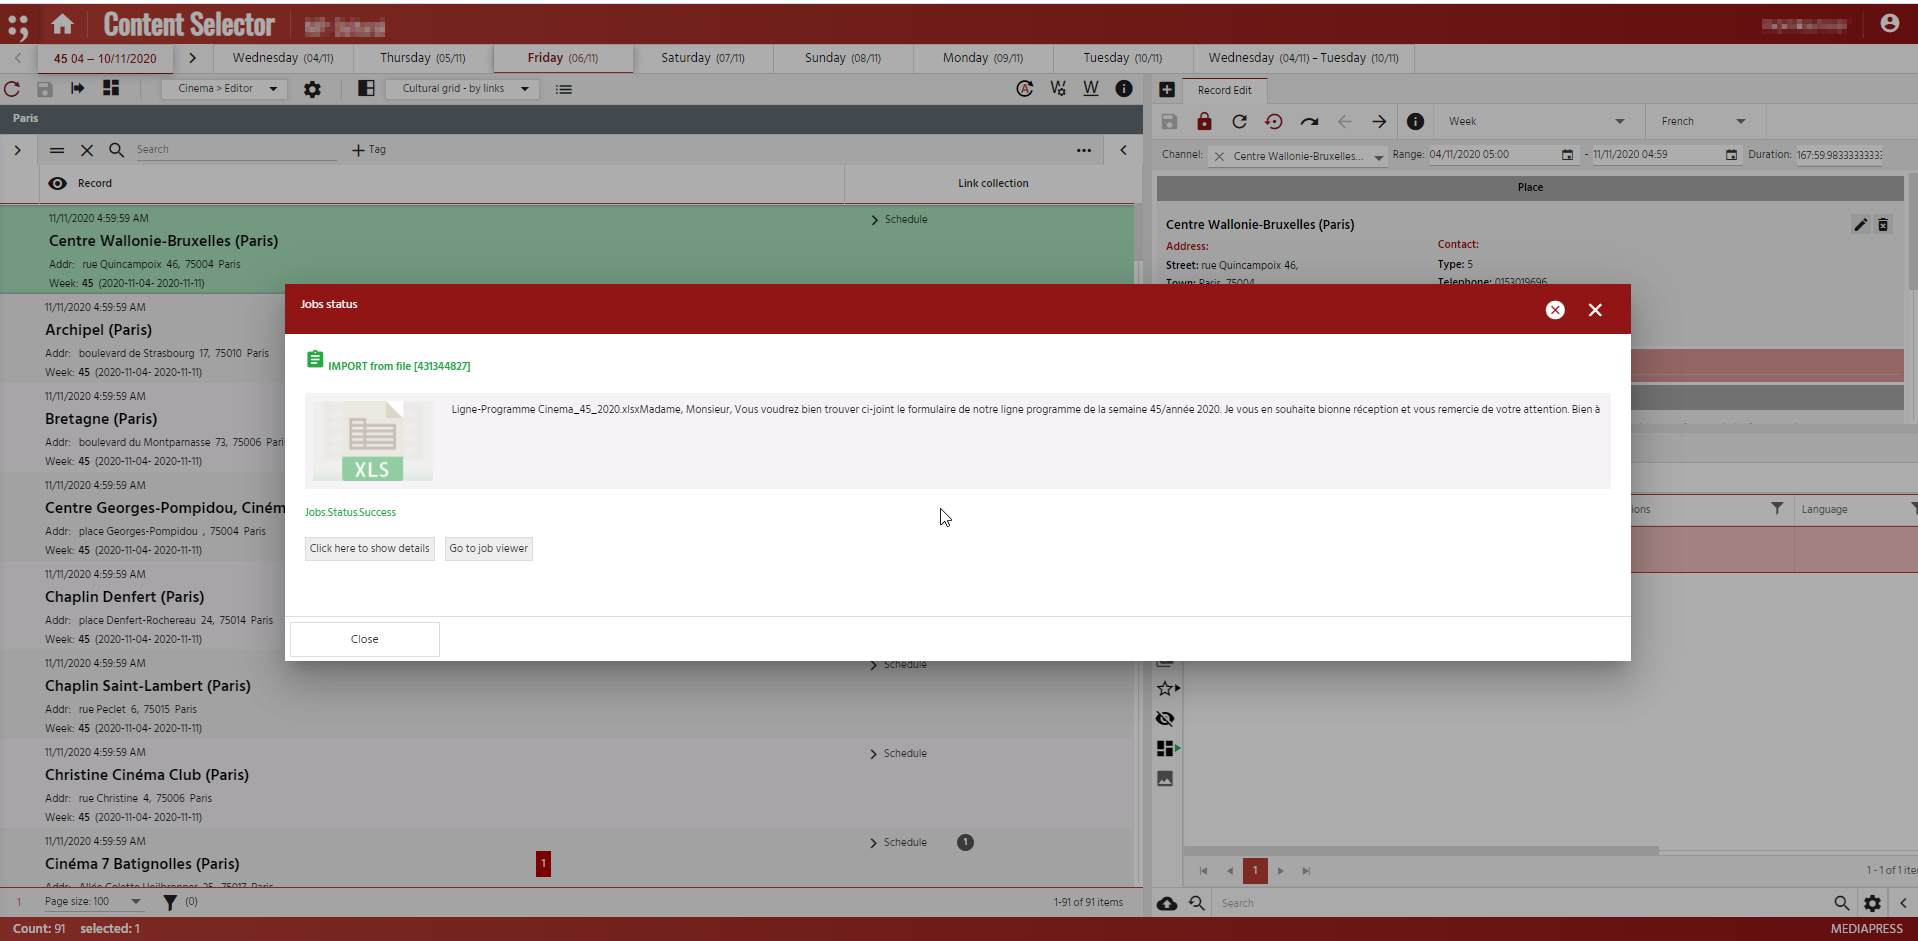
Creating jobs from Content Selector
We added the “Actions” button to the “Photos” and “Attachments” widgets to open submenu with defined actions for a given product.
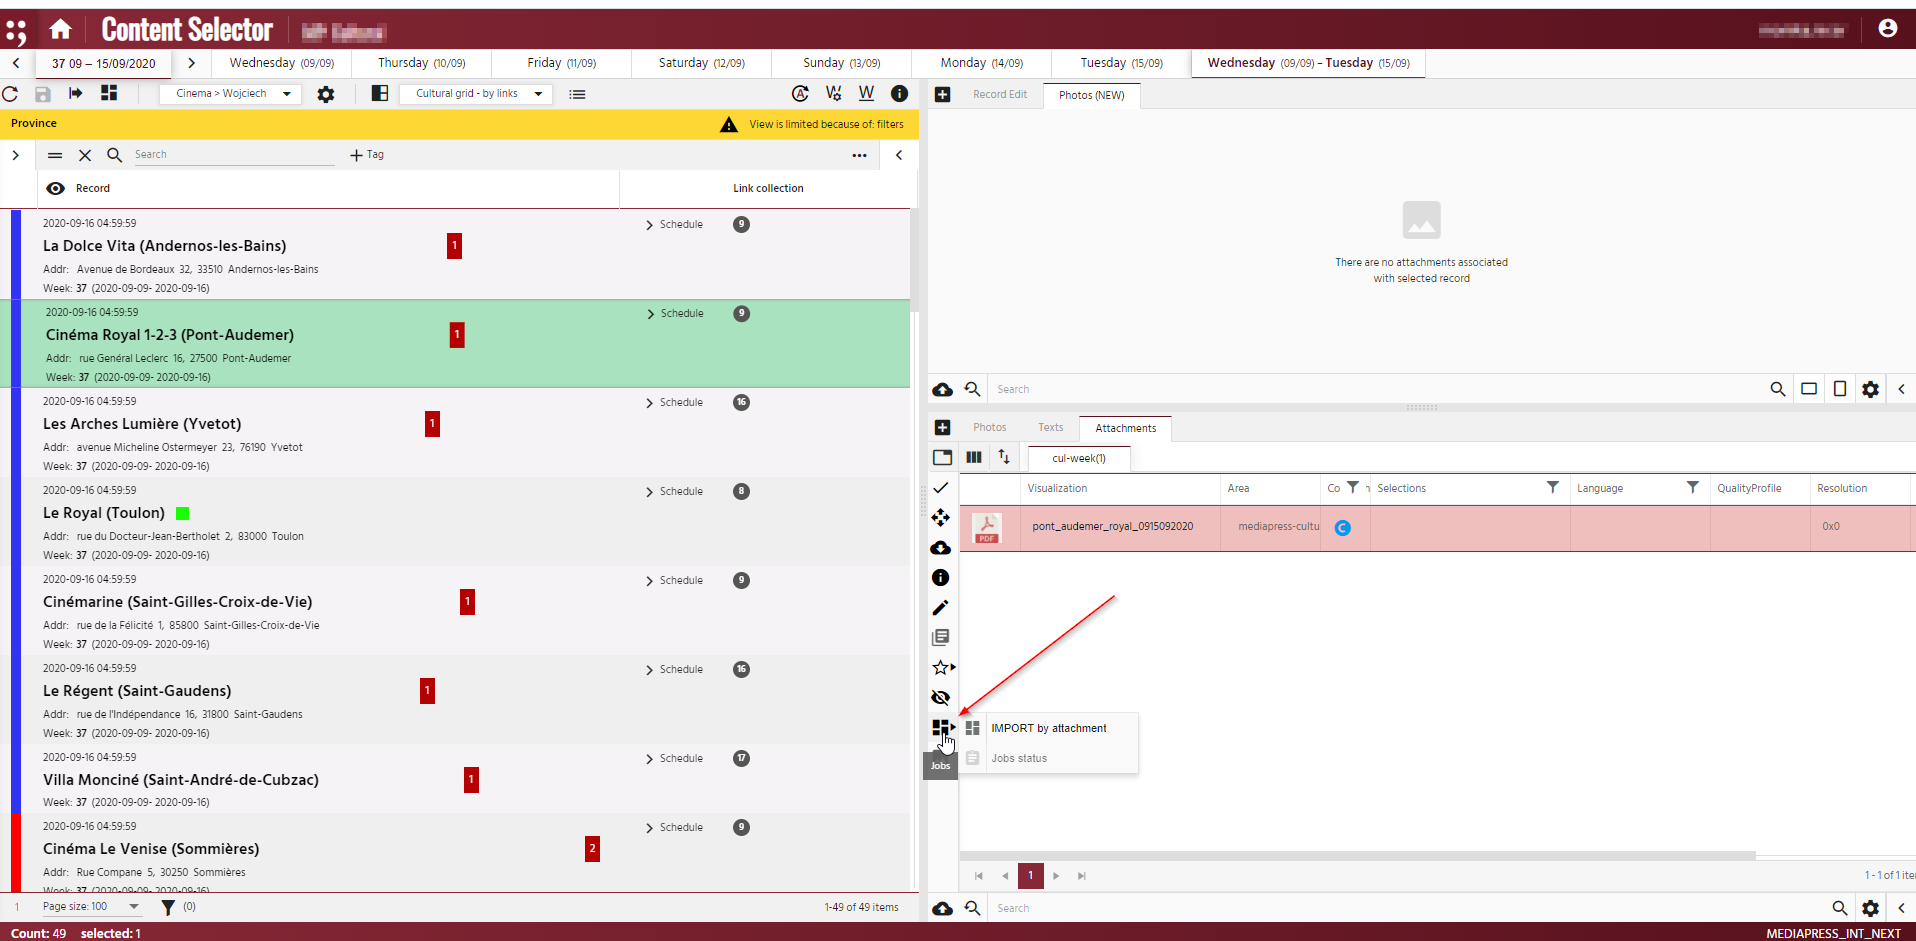
This button allows you to import data from a PDF placed in the system.
If the record does not exist, it cannot be clicked and the button is grayed out.
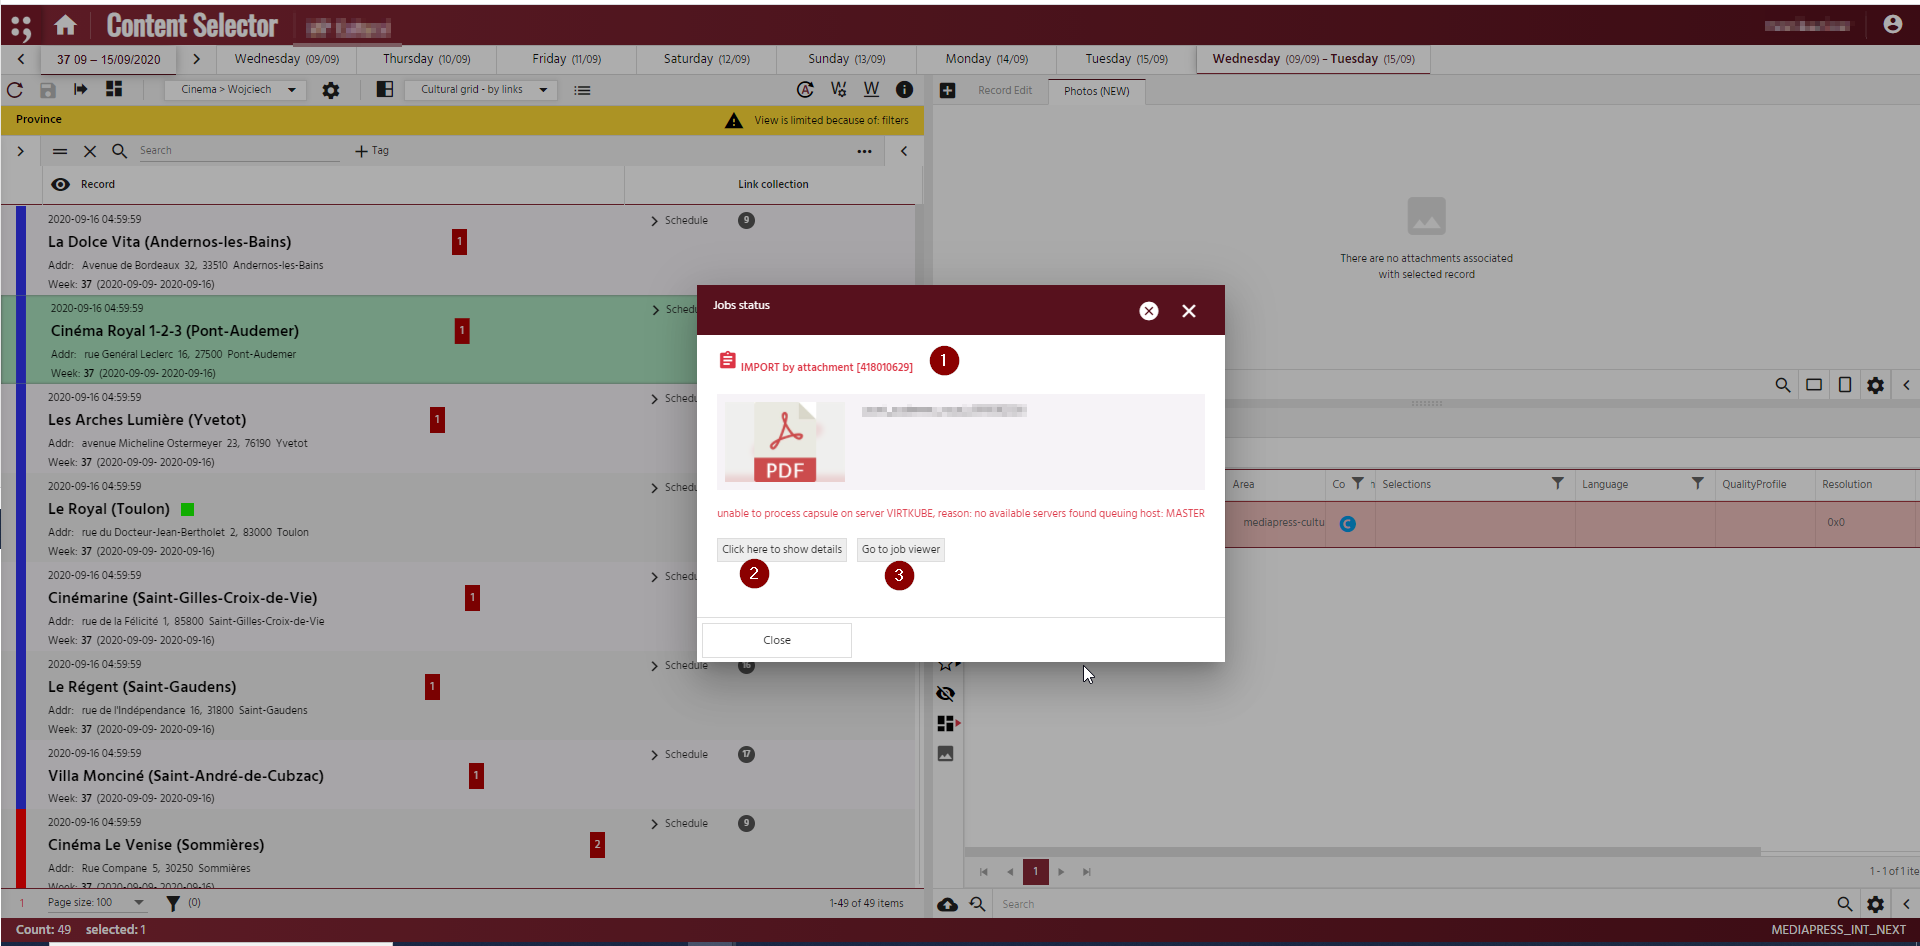
After selecting an available action, a job is created and a message confirming this fact is visible.
When we click on the “Job status” message, we can check the update of our job [1], get more details about the error [2] or move to the job queue [3].
Phoboss
The possibility of changing the preview for video and document files in the UI
We’ve added the possibility to change the preview for video files (mp4) and document. When uploading a video, you can choose a specific frame of the video to be shown as a preview or set any other photo from the disk. It can be also set in the search tab for already uploaded attachments).

LanguageFeature – original
Language as the feature has been extended by the value “original”. It means that the text in the picture is suitable for all languages. The special value would mean that the title is international and known by everyone – for example the title of the movie “Kill Bill” or “1984”.

Additional filters and more useful functional Phoboss UI
- The visibility of these functionalities has been removed. They are only possible to use as search tags.
- New filters have been added and their order is sorted by usage:
– Paid
– Grayscale
– Orientation
– Show hidden
– My photos
– Print only

New filters:
– Source
– search by photo source
– Restrictions – possibility of selection or leave it blank:
- Unrestricted
- Source
- Event
– Event date (available only for restriction = Event). The following options can be selected:
- Today
- Next week
- Next month
- Custom – we give you the possibility to set a specific time range

Adding to that a new tag has been added, which allows searching by the author of the photo.


Content Selector
New preselections – media types
Due to the fact that it is possible to store video files both in Phoboss and the attachments, a need for specification of the data type occurred. We have added a window that allows selecting a data type in the preselection.

For all the data type other than “Photo”:
- “Cropping frames” and “Imogene” tabs disappear
- Crop Mode is “NoCropping” only
- “Upscale limit” disappears


Migration of Channels to the web version & introduction of new features
We have performed a full migration of the Silverlight Channels panel to the web version. In order to improve the scenarios of dealing with TVMan data, we’ve also added the new channel properties – Type and Access.
The Type property contains information about the type of channel. The following types are defined in TVMan:
- “ST_TV” – the TV tag
- “ST_DIST” – the distributor tag
- “ST_CIN” – the cinema tag
- “ST_RADIO” – the radio tag
- “ST_VOD” – the VOD tag
- “ST_PPV” – the Pay per View tag
- “OTHER”
The Access property contains information on how to access the content:
- Free – a free channel
- Video on demand – a website where you pay for watching (e.g. Chilli or vod.onet.pl)
- Subscription – a service that requires subscription (e.g. Netflix)
Channels migrated to the web app (System manager)
We have moved the Channels panel from Frred to Angular and also added the new channel properties. Adding to that in the list of channels we have added the option of filtering by
- Type
- Access

Preselection Universal – a new type of preselection definition
We have added a new type of content preselection to the system, which is independent of the linking vector of the local content location -that’s why we called it “Universal”. If you set up this preselection on a selected schema then it will be visible always where this schema appears. Independently from linking vectors for this schema or channels where it is occurring. The only requirement is that this universal preselection has to be in the product. Feature available only in Content Selector in the web version.
New features for convenient editing of tag lists
To widget record edit in Content Selector in web version have been added 2 features to displaying variables type ENUM ARRAY – TagEditor and TagEditorVertical.

New edition of CS Web link collection
In the current version of our software, editing of a large number of links in the product has been facilitated.
The new solution allows full-scale edition of the link collection. We have created an upgraded grid mode in Content Selector, which has:
- View level management
- Buttons for editing the link collection
- The panel for searching in the context of the current view.

The main view after clicking on link collection:

By clicking, you will be redirected to the selected collection, the content of which is visible in the grid. The visualization of the record from which the transfer was made is displayed above the grid. You can’t see the column panel in this view.
In the upper left corner there are:
- Button to return to the main view of the product.
- Button to return to the previous view. It is an exit one level higher – to the diagram above the current diagram.
- Button showing the current nesting and taking you back a few levels up.
- Visualization of the record from which the transfer took place.
- The name of the schema from which the transfer took place.
Panel showing nesting:

- Visualization of the record from which the transfer took place.
- Schema of this record.
In the upper right corner, there is a panel that allows you to edit the collection of links:

- The window for link search.


When you click on the magnifying glass icon, a link search window pops up.
This window includes:
1 – Search window.
2- Ability to manage search levels.
3- A column with buttons for each link that allows you to add a link to the collection.
4 – Information about a given record
- Adding a new link to the collection.
- Separate link / removing linking from the collection.
- Button enabling quick use of filters currently assigned to the scheme.

- Sort button.

Below the record view from which the transfer took place, there is a bar which is used to search in the context of the current link view.

On the right is the filter panel for the current schematic. Filters filter only the collection shown. Sorting is the same.

Oxana
New parametr to API/Oxana
We have added a new parameter to the API that could be used to get already-processed data. The new feature allows you to view details on how the processed file will look in its final form.
For example: /oxana/{exportId}/{recordIId}?stage=processed
What’s more the script sets the mime-type of the returned data in the API stanza.
Generating final photos, script integration and changes in the “Access” tab
From now on, there is a distinction between the Data and Photos tab.
The data on the Photos tab will be used so that Oxana can not only generate JSON files but also production, trimmed graphic files. Thanks to the release, Oxana will be able to produce on its own files and provide the customer with a full set of production data.
DATA TAB
In the Data tab, we remove Push and Pull. So in the Service list, we have:
– Do not generate – driver “dummy” – does not generate final files
– Filesystem – current Pull
– Azure Blob Storage – new driver uploading files to Azure blob storage
– PostgresSQL
– Cosmos DB – current Azure document database
– Elasticsearch

SCRIPT TAB – Contains Python script parameters

PHOTOS TAB: In the Photos tab we have on the left side a list of preselections.
For each of them, we can define generating a photo for a given storage. One of the following targets can be selected from the menu:
– Do not generate – the default
– Filesystem
– Azure Blob Storage
With the introduction of a global definition of accounts and services, panels with target parameters simplify
Target – Do not generate
Target Do not generate means that we do not generate photos for this preselection. If a different target is selected, we can also determine whether:
– photos are generated from HD previews (yes by default) or from full photos.
– photos with a color profile other than sRGB are converted to sRGB – enabled by default
– photos have cut IPTC / EXIF tags to make them smaller – enabled by default

Target – Filesystem

Target – Azure Blob Storage

Oxana – New section: Users and Timestamps
We have added a new section: Users and Timestamps. There are six comboboxes included:
– Export created timestamp – created
– Export modified timestamp – modified
– Export last timestamp – lastModified
– Export created user – createdUser
– Export modified user – modifiedUser
– Export last user – lastModifiedUser
and ComboBox with:
– Export full timestamps
– Export dates only

Checking the checkbox results in additional export of the field with the above postfix containing information about the creation/modification date or the creating / modifying user. So for example:
“fields”:
{
“field1”: “aaaaa”,
“field1__created”: <timestamp>
“field1__createdUser”: “franek.malina”
}
Export last user and Export last timestamp contains the value from the “modified” fields, and if they are empty – from the “created” fields. Thanks to this, they always contain info about when the field was last modified or created.
ComboBox decides if dates are exported as full timestamp or in “yyyy-MM-dd” format
Oxana UI optimization
Lazy-loading data has been turned off – at the start we load all data, cache common data between export changes.
- We have integrated the Channel and Content types and created only one Content type.
– The Channel tab appears if the root export pattern is of the Timeline type.
– Schemas and Triggers tab remains as in Content – instead of many root schemes – only root scheme selection.
- Schemas and Triggers
– “Triggers” tab changes. We change Tab Triggers to Schemas.
– The following has been added to the schema properties tab:
– Export all fields (default)
– Do not export fields
– Export selected fields – available list of schema fields that are exported.
– Export only when link exists -> Export root only when this link exists
– Export only deleted links -> Export deleted (✓) (new)
– Checkbox “Export old data” – has been moved to Scheme properties.
– “Export when” tab
– only shows if selection is in root schema
– New name Filters
- For Filesystem and Azure storage added:
– Checkbox Zip packages (off by default)
– Package size numeric value (default 5000)
– Numerical value of Retention (default 14)
- “Export all channels” moved to the Channels tab
- Languages tab
– language abbreviations with full names
– Added “Select all / deselect all” buttons
– Add radiobutton “Export all languages / Export” above the list
- Top panel
– “Frequency” checkbox removed
– “Thread number” changed to Max thread number
- Status panel
– “Pause” button removed
– Refresh refresh stats.

- Schemas tab in PRODUCT type
– Root schema list shows the sum of the root schema the columns of the selected product are based on
Filter of exported attachments in UI Oxana
We have added an additional filter of the exported attachments. It can take one of 4 values:
– None – no filtering – we export everything
– Channel group match – we export mediarecords in which bestMediaFile has channelGroupMatch == true or channelMatch == true
– Channel match – we export mediarecords in which bestMediaFile has channelMatch == true
– Emission match, we export mediarecords in which bestMediaFile has emissionMatch == true


Oxana – generating photos
The new Oxana introduces the ability to generate selected and cut photos. The process of generating a photo consists of:
- Downloading the photo or its HD preview
- Performing the normalization of the photo orientation. Some photos have the Exif Orientation tag set
- If the Convert to sRGB option is enabled: checking if a profile other than sRGB is associated with the photo. If so – conversion to the sRGB profile (http://www.imagemagick.org/Usage/formats/#color_profile)
- If Strip IPTC / EXIF is enabled: cut all IPTC / EXIF tags. After this operation, only the Source tag will be added (https://iptc.org/std/photometadata/specification/IPTC-PhotoMetadata#source) containing the entry: Phoboss: <mediafile id>
- Execution of the trim defined in the selection
- Copying to the appropriate storage (file on disk or blob in Azure).

Area Manager\Preselections
Imogene guide mask
For photos opened in Imogene, there is a possibility to display masks (guidelines). It is working similar to a watermark. During attaching or uploading title cards this mask will not appear on the photo.

You will only need to provide us with a PNG file with a mask which you want to see in photo selection. Mask from the above example:

Import new TvMan preselection, available from Area Manager level
In the preselections tab, thanks to the release, there are 3 new radio buttons

After choosing ‘TvMan’ checkbox appeared an additional drop-down list, which allows us to choose one of the new TvMan preselections. Appoint some preselection result filled another field values from TvMan preselection definition like Crop mode, Max number of photo, Upscale limit. Selection schema.

In the new Automation tab there is:
– Toggle “Sync enabled” – button turning ON/OFF selection synchronization
– Button turning ON full synchronization

Admin\Mappings
Selector GetPreselection and image selection from universal selection in nested links

In the mapping on the s-event level (or lower, eg from the tv-event level to which the s-event is connected), you can use the GetPreselection selector to map the “logo” preselections of both teams as two separate fields.
Additional properties in the GetField selector
GetField selector has been enhanced by new options:
- Created by
- Modified by
- Creation time
- Modification time

Area Manager
Universal import/export of channel lists
We dedicated this feature to the support departments, which will no longer have to manually process/click through hundreds of channel lists. We have created a system mechanism for importing lists from a text file.
We introduced a simple input file format in which:
- There is one channel per line
- The channel identifier starts with the first alphanumeric character
- The channel identifier ends at the first non-alphanumeric character (except _ and -)
After selecting the option, a dialogue displays that allows:
- Indicate the desired source of the imported file
- Select the identifier standard (in the form of radio buttons):
- TVMan – string identifiers from TVMan Next
- External Id – external channel ID
- JSON alias
- GUID
3. The “Enable import” checkbox is enabled by default – if it is enabled, after importing we check whether the channels we have imported are enabled for import and if not – we enable them and start re-importing.
4. After clicking on the “OK” button, the option loads the data and returns a collection of identifiers.

The feature has been introduced in the:
- Oxana/Channels/Output channels
- Area Manager/Profiles/Columns
- PeDo/Columns
- PeDo/Columns Grouping
- Admin SL/Fred/Channels
- Admin SL/Fred/Channels/Groups
- Automation/Configuration sender
Area Manager\Profiles – Grid
Default visualization in the grid profile
The option to set the default visualization has been added to the grid profile. The visualization is applied when the grid profile is selected.

Area Manager/Product editor/ Texts archive configuration
Harvesting text with soft/hard-line feeds to live archive
Two additional toggles have been added to the product configuration:
– Harvest soft-line feeds to live archive
– Harvest hard-line feeds to live archive
By default, new harvesting methods are disabled.

Area Manager\Product Editor
Visibility of Azure / File accounts in the product
Azure / File storage account visibility has been created for the product. Just go to the Area Manager application and select the “product editor” tab. Then, in the product edit window, go to the “Dependencies / Accounts” tab and on the right side you will see a window with this type of account.

To add an account to the product, click the plus icon in the upper right corner of the window. Select the appropriate account and click “add”.

When the account appears in the window, save the changes.

Due to this change, the product will gain the possibility of storing accounts. In the future, we will have the opportunity to expand functions, for example with the visibility of final pages.
Final solution to migration between InDesign versions
To solve the migration problem, we have added a new Migration section which consists of 3 fields:
- valid from year
- valid from issue
- InDesign server version

These values can be set during the multiedition of products.
What’s more, we have added information about the appropriate InDesign version to the properties (in which version of the InDesign release will be opened).

If the above-mentioned fields are set in the Migration tab, each issue whose initial date is greater than the entered date will be opened with a new version of InDesign.
We have also provided information about the new version of the InDesign version in the corresponding column. After migration between versions, a notification will be displayed after the arrow (ex. CS6 -> CS2020) with the additional tooltip info about the release.

Default language for the search in the search column
We have added the new parameter that sets the default search language.

The parameter is optional – without setting it, it stays as automatic as now.
You have the option to choose one of the supported languages or “all”. This way, you can set the language which is not set as the main language.
Actions
Action panel – new options
In the action panel, in order to allow Hubert to perform actions running in Kubernetes environment (e.g. importers or custom exports) following functionalities have been added:
Action Scope has been extended by:
– Photo attachment;
– Video attachment;
– Data attachment;
– Attachment – (action performed on all attachments)
– Content
The macros available in the parameters have been extended at this point by:
– contentId – content identifier in the context of which the job was called
– mediaRecordId – mediaRecord identifier of the attachment on which the job was called

Phoboss\Filters
New UI management filters
In order to improve the overall UI of the Phoboss Admin system, we have introduced the new filter tab. To get the access to the tab in application, we need the Phoboss_ManageConfiguration permission.

After the correct implementation of the filters, they will be available in the CS web.
In Admin, at the administrative level, the number of filters can be defined. Each of them has a name, unique name, JsonAlias and visibility in a selected number of areas (permissions).
The filter can be placed on the following elements of the photo description:
- Source – whitelist and blacklist or null
- Agency – whitelist and blacklist or null
- Paid – yes or no or null
- Author – whitelist and blacklist or null
The logic of whitelist and blacklist filter operation is as follows:
- A) if a whitelist is defined, there is a limit of results to those photos that meet it. In other case – all photos are accepted.
- B) If a blacklist is defined, the set of photos from the selected source is taken and others that meet blacklist are removed.
Adding to that we have added an optional parameter in Phoboss functions that perform searches/selections – all the filters that must be met by the photos in order to be returned.
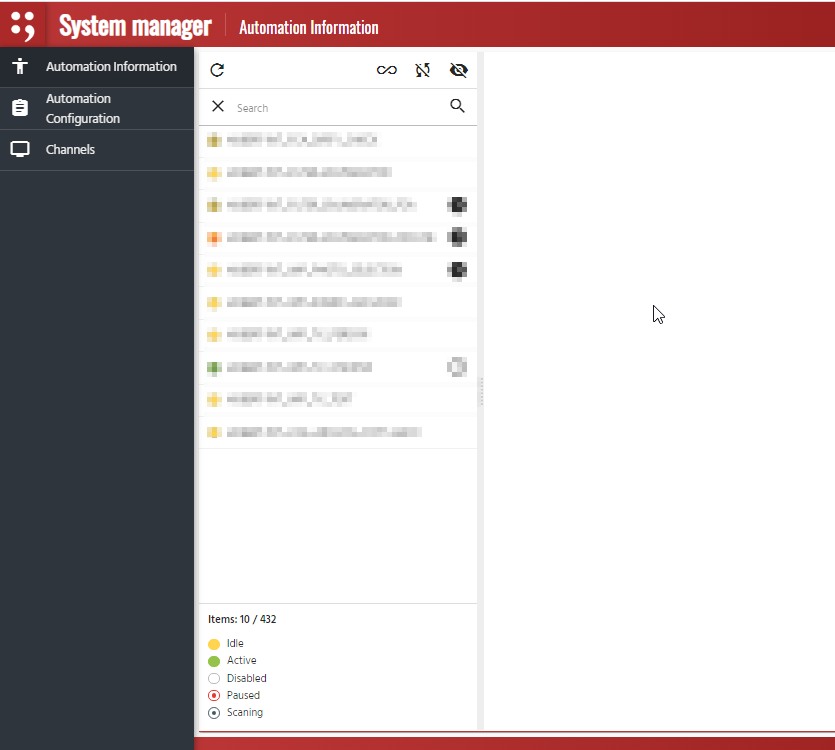
System Manager
New System Manager tab
We have created a collective System Manager app containing panels available only for “large” system administrators. It resembles the structure and appearance of Area Manager.
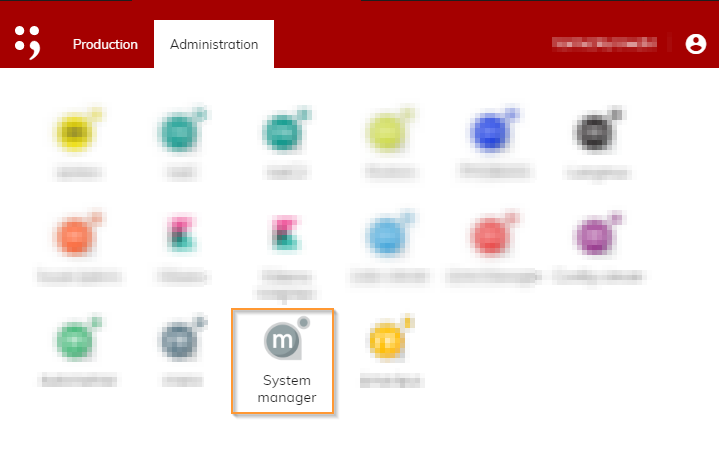
The Automation and Channels panels has been also added to the System Manager.
No Comments